This is the story of how a simple rendering problem turned into a small descent into madness. It started with floor tiles and wall segments — and ended with me re-deriving trigonometry and then deliberately ignoring it.
The Naive Start
In the early version of the renderer, everything was simple:
- Floor tiles were drawn with no scaling or rotation. Textures of 128x128 were just taken and drawn.
- Wall segments had two dedicated textures: a horizontal texture (128x32) and a separate vertical texture (32x128). Just two different
.pngfiles. - Rendering code was clean, direct, and straightforward.
It worked great… until it didn’t.
The Gaps That Shouldn’t Be
As soon as I added camera zoom, especially non-even scaling values (like 0.7x), visual artifacts started creeping in:
- Thin gaps appeared between tiles and wall segments
- These gaps weren’t logic errors — they were rounding issues in texture sampling
My temporary fix? Fudge the sprite sizes: I scaled up each sprite by a few pixels to “bleed” over the edges and hide the gaps.
It worked well enough — until I decided to outsmart myself.
Placing Walls Between Tiles
I had already made a design decision that would further complicate rendering: Rethinking Walls: Between Tiles, Not Inside
Walls don’t live inside tiles — they live between them.
This is great for simulation and structure — it lets you place doors and walls logically, like a real building — but it introduced a new rendering challenge.
To make walls visually seamless, I had to:
- Render them overlapping with the tiles and with each other
- Carefully position horizontal and vertical wall segments so their edges touch perfectly, including at corners
- Scale wall sprites so they’re slightly longer than the tile spacing to close visual gaps
This required:
- Calculating exact on-screen rectangles for wall segments — including future-troublesome vertical segments, of course
- Tweaking sprite size and placement per orientation
- Manually overlapping horizontal and vertical segments to eliminate corner glitches
I had wrote a utility method in the rendering system which accepted the target on-screen rectangle and calculated necessary scales in both axis.
That worked — until rotation entered the picture.
Killing the Vertical Wall Sprite
I didn’t want to maintain separate vertical and horizontal versions of every wall texture. It’s definitely not something you as a modder should care — to manually rotate your textures every time when you want to make a change to a “basic” texture.
After all, it’s just a 90° rotation, right? MonoGame even gives you a SpriteBatch.Draw() overload that takes a rotation and a scale. What could go wrong?
Quite a lot, as it turns out.
The Rotation Pitfall
MonoGame’s SpriteBatch.Draw() lets you specify:
- A
rotationangle - A
scale - An
origin(i.e., pivot point) - And a
positionwhere to draw
But the documentation doesn’t tell you clearly what order these are applied in — and the results were unpredictable.

That’s just scaling, should be simple as rock…
As I switched from the overload of .Draw() allowed me to specify an exact target on-screen rectangle (as it didn’t allow for rotation) to the overload of .Draw() which only accepts position and scale, I thought that it can be simply fixed by trivial algebra:
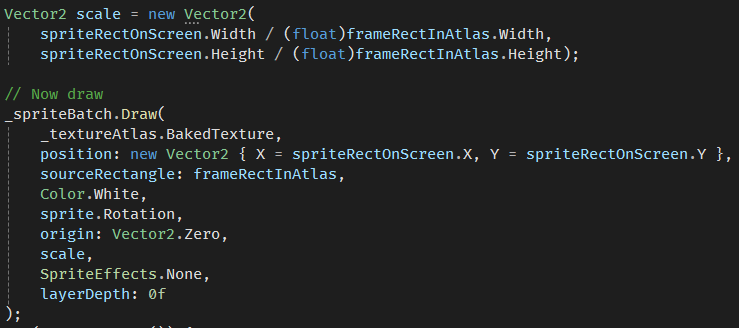
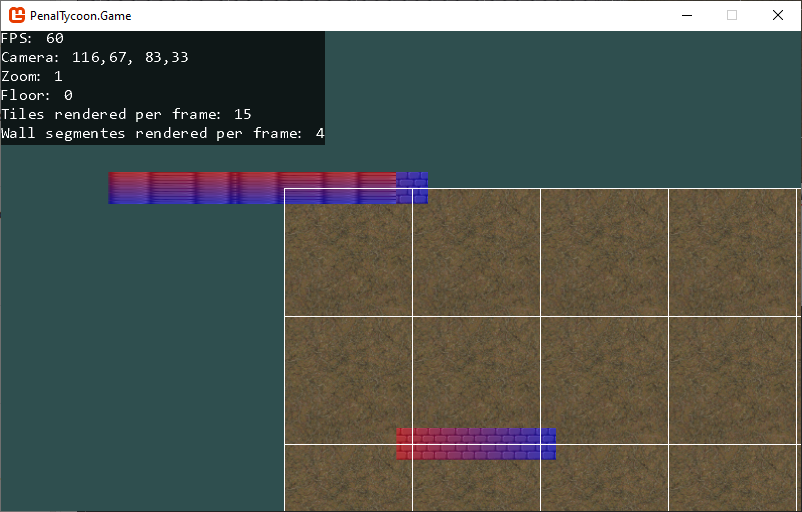
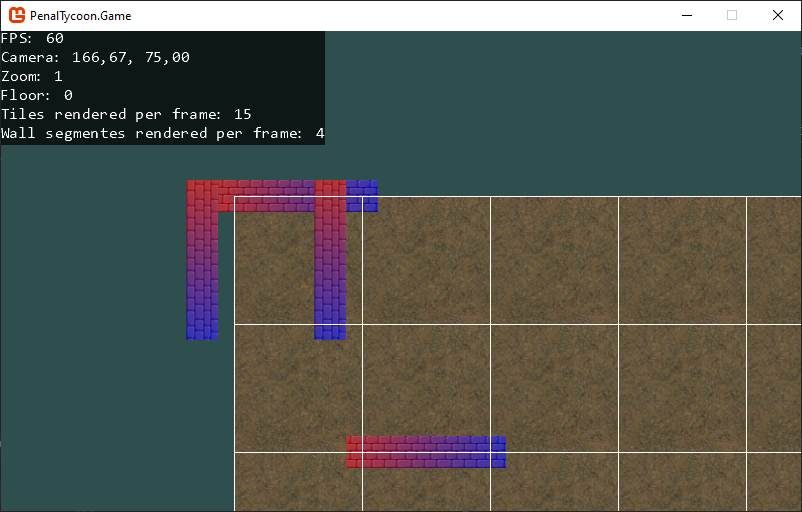
The result was an ultimate mess (gradient red-blue coloring was intentional for debugging):
Dive into MonoGame code
I can’t appraise it much indeed in that piece of code they have. But it gave me clear hints on the order the transformations are applied: scale first, rotation then.
I was a bit worried about another complication: that I call the .Draw() not on an individual texture but on the texture atlas. But fortunately, MonoGame made a great job on accounting for that, and I didn’t have to worry about rotation of coordinate space of the texture atlas.
Back to math class
So, I had to figure out how to properly calculate the scaling by X and Y axis.
Of course, the simplest solution would be to just check Rotation for 90°: if it’s so, then reverse scaling parameters. But I wanted to understand how the math works, and to come up with a universal solution which would work for an arbitrary angle.
I even had to sketch up something in my notebook, just like decades ago in math classes:
Ooookay, it was crystally clear that for the 90° case I have to divide the height of the target on-screen rectangle by the width of the texture in order to get the correct scale_X value. And for 0°, it was width by width.
But how the core engine method would know universally for an arbitrary angle what should go as a numerator of the fraction? I needed a more generic formula.
After thinking for dozens of minutes, I realized that I can generalize the thing with a bounding box. The idea:
- Rotate the target on-screen rectangle against the rendering rotation by the same angle (so that, for sample 90°, the rotated target on-screen rectangle would get oriented the same as the original texture)
- Bound the rotated rectangle with a screen-wise rectangle with strictly horizontal and vertical edges (this step does nothing for right angles like 0°, 90°, but makes the difference on, say, 45°)
- Divide this backward-rotated (optionally-bounded) “target” on-screen rectangle width by the original texture width (and same for height)
But how exactly do I rotate a rectangle?
Googling didn’t help much, to my surprise. It is flooded with school trigonometry formulae for space rotation, but it only works for the Cartesian coordinate system. In MonoGame (as in any other video game framework and, generally, in any video handling tool) the Y axis goes from top to bottom. So, just blind application of googled formulae gave me all the quirks one can imagine: walls went wild jumping over tiles, flipping and so on.
Modern highly-appraised AI assistants also weren’t willing to help me at those days. (Maybe their owners got cosmic electricity bills by the end of month and decided to scale down their neural machines?) For example, ChatGPT tried to assure me for several hours that:
- the formulae for Cartesian must work virtually as-is, just need to flip the sign of the angle value;
- I need to check the origin (the point around which the rotation happens) and drop more and more code to it;
- finally it gave up saying me to stick with hardcoding height/width division for 90°.
Ridiculous.
In the end of the day, I had to re-derive the coordinates-rotation formulae on myself, indeed for the screen coordinates. Of course, they were not much differing from the school ones, just a magic with signs. But what an amazing journey to the world of geometry theorems it was…
The Offset Struggle
Even after settling on top-left as the pivot, there was still the issue of fitting the sprite into the rectangle I had designed for it on screen.
Let’s say:
- The wall sprite is 128×32 pixels
- I want to rotate it 90° to make it vertical
- And I want it to fit exactly into a 32×128 on-screen rectangle
Easy? Not really.
Because of how rotation is applied around the origin before translation, I had to manually calculate the shift needed for the rotated sprite to land in the right place.
This meant:
- Figuring out the rotated size
- Applying the correct translation offset after rotation but before drawing
- Debugging by drawing outlines and comparing coordinates pixel by pixel
The Final Decision
Eventually, I said: enough.
I made a decision:
- All rotations are around the top-left corner. Period.
- I compute the scale and pre-shift the position manually.
No more pivots. No more origin points. Just:
- Rotate from
(0,0) - Scale the source rectangle to match the destination size
- Offset the top-left corner before drawing so the sprite lands where I want
This gives me full control:
- I can rotate anything by 90°, 180°, or 270°
- I can scale sprites into any target rectangle
- And the math — while manual — is clear, predictable, and never changes behind my back
What this means for the engine (and modders)
For modders:
- You don’t have to worry about rotation quirks — the engine handles sprite layout for you
- If you want to rotate or flip a sprite, just set a flag — you don’t need to think about offsets or pivots
- All your assets can be cleanly reused for different orientations
Under the hood, the system:
- Scales sprites to fit a destination rectangle
- Applies 90°-step rotations
- Offsets the draw position so everything lands pixel-perfect
The Moral
Sometimes the elegant solution is to give up on elegance.
Instead of fighting MonoGame’s transform pipeline, I took full control of it — and now the renderer behaves exactly as I want.
The result: fewer bugs, fewer surprises, and a better experience for everyone who builds on top of it.